Διαχειριστής Λογαριασμού
Ο Διαχειριστής Λογαριασμού είναι μια επί πληρωμή επέκταση του λογαριασμού Premium, σχεδιασμένη να διαχειρίζεται τα χωριά σας αν έχετε μεγάλο λογαριασμό. Ως εκ τούτου, είναι διαθέσιμο μόνο όταν έχετε στην κατοχή σας 20 χωριά.
Μπορείτε να ενεργοποιήσετε τον Διαχειριστή Λογαριασμού χρησιμοποιώντας πόντους Premium. Για να τον ενεργοποιήσετε, πατήστε στο μενού Premium μέσα στο παιχνίδι, και πηγαίνετε στο «Διαχειριστής Λογαριασμού».
Επισκοπήσεις
Η σελίδα επισκοπήσεων στον Διαχειριστή Λογαριασμού σας παρέχει πληροφορίες σχετικά με την κατάσταση του Διαχειριστή λογαριασμού σας και τι κάνει αυτή την στιγμή. Κάθε κουτί περιέχει πληροφορίες σχετικά με ένα διαφορετικό μέρος του Διαχειριστή λογαριασμού σας, και μπορείτε να τα επιλέξετε και να τα σύρετε στην οθόνη και να τα τοποθετήσετε στην σειρά που εσείς θέλετε.
Επιλέγοντας το εικονίδιο του εργαλείου όπου εμφανίζεται στην αριστερή γωνιά σε ένα από αυτά τα κουτιά θα σας επιτρέψει να προσαρμόσετε τον αριθμό των καταχωρήσεων που θα είναι ορατά στην επισκόπηση.
Τελευταίες λεηλασίες
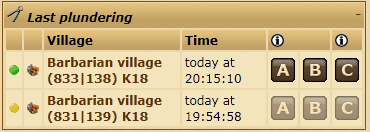
Αυτό το εργαλείο μπορεί να χρησιμοποιηθεί μαζί με τον Βοηθό Farming για να αποστέλλονται εύκολα επιθέσεις farming σε χωριά των οποίων οι πόροι είχαν πρόσφατα κλαπεί. Δείχνει βαρβαρικά χωριά στα οποία είχατε πρόσφατα επιτεθεί και από τα οποία είχατε κλέψει πόρους.
Για περισσότερες πληροφορίες σχετικά με τα εικονίδια A, B and C, παρακαλούμε δείτε το Βοηθό Farming.
Επισκόπηση Χωριού
Στον πίνακα Επισκοπήσεις χωριού , χρωματιστές τελείες δείχνουν την κατάσταση των στρατευμάτων σας, του Χωριού και της Αγοράς. Μια Πράσινη κουκκίδα δείχνει ότι ο Διαχειριστής είναι ενεργοποιημένος. Μια Γκρι κουκκίδα δείχνει ότι δεν έχουν ανατεθεί εργασίες, και μια Κίτρινη κουκκίδα υποδηλώνει ότι το χωριό είναι υπό Διαχείριση, αλλά ο Διαχειριστής έχει διακοπεί προσωρινά.
Επιλέγοντας την Πράσινη ή την Κίτρινη κουκκίδα θα διακόψει προσωρινά/επανεκκίνησή τον διαχειριστή λογαριασμού στο χωριό, και επιλέγοντας την Γκρι κουκκίδα θα σας μεταφέρει στην οθόνη διαχείρισης του χωριού.
Κατασκευή Προτύπων
Το τμήμα της κατασκευής προτύπων σας δίνει μια επισκόπηση όλων των προτύπων του Διαχειριστή Χωριού.
Μπορείτε να δείτε τον αριθμό των χωριών που έχει ανατεθεί σε κάθε πρότυπο, πόσα από αυτά τα χωριά έχουν διακόψει και ο αριθμός των κτηρίων που έχουν ήδη στην ούρα.
Προειδοποιήσεις και Συστάσεις
Αν το Αγρόκτημα σας είναι γεμάτο ή η αποθήκη σας είναι γεμάτη, για παράδειγμα, θα σας ειδοποιήσει εδώ.
Ειδοποιήσεις
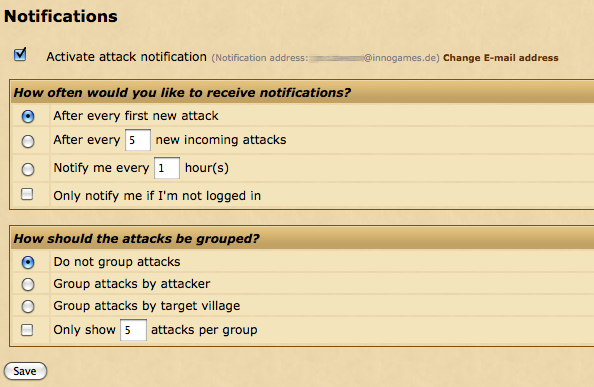
Στην σελίδα των Ειδοποιήσεων, μπορείτε να ρυθμίσετε τον Διαχειριστή λογαριασμού ώστε να σας ειδοποιεί με e-mail όταν έχετε νέα εισερχόμενη επίθεση. Για να ενεργοποιήσετε αυτή την επιλογή, επιλέξτε το κουτί που λέει "Ενεργοποίηση ειδοποιήσεων εισερχομένων επιθέσεων". Αυτό θα σας επιτρέψει να προσαρμόσετε τις επιλογές σας.
Οι επιλογές χωρίζονται σε δύο ενότητες.
Πόσο συχνά θέλετε να λαμβάνετε Ειδοποιήσεις;
Το πρώτο μέρος της φόρμας χειρίζεται τις προϋποθέσεις υπό τις οποίες θέλετε να λαμβάνετε e-mail για τις εισερχόμενες επιθέσεις.
| Μετά από κάθε νέα εισερχόμενη επίθεση | Θα ειδοποιείστε όταν ο αριθμός των εισερχομένων επιθέσεων είναι 1, από 0. |
| Μετά από (XX) νέες εισερχόμενες επιθέσεις | Θα λαβαίνετε ειδοποίηση όταν ο αριθμός (XX) νέων εισερχομένων επιθέσεων στέλνονται προς τα χωριά σας. |
| Ειδοποίηση κάθε (XX) ώρα(ες) | Θα λαβαίνετε μόνο μια ειδοποίηση ανά αριθμώ ωρών (XX) που έχετε επιλέξει. |
| Ειδοποιήστε με μόνο αν δεν είμαι συνδεδεμένος | Αν έχετε αυτή την επιλογή, θα λάβετε ειδοποίηση μόνο αν δεν είστε συνδεδεμένος, ή αν ο λογαριασμός σας είναι σε αδράνεια. |
Πως πρέπει να ομαδοποιηθούν οι Επιθέσεις;
Αυτό το μέρος της φόρμας χειρίζεται τι θέλετε να δείτε στις Ειδοποιήσεις των επιθέσεων σας.
| Μην ομαδοποιηθούν οι επιθέσεις | Οι επιθέσεις θα δείχνονται με την σειρά, χωρίς ομαδοποίηση. |
| Ομαδοποίηση επιθέσεων ανά επιτιθέμενο | Οι επιθέσεις θα δείχνονται ανάλογα με τον επιτιθέμενο. |
| Ομαδοποίηση επιθέσεων ανά αμυνόμενο χωριό | Οι επιθέσεις θα δείχνονται ανάλογα με το χωριό που δέχεται τις επιθέσεις. |
| Δείξτε μόνο (XX) επιθέσεις ανά ομάδα | Οι ειδοποιήσεις θα δείχνουν μόνο τον αριθμό (XX) των επιθέσεων από κάθε κατηγορία. |
Διαχειριστής Χωριού
Ο Διαχειριστής Χωριού μπορεί να χρησιμοποιηθεί για να αυτοματοποιήσει την αναμονή των κτιρίων στα χωριά σας. Μπορείτε να τροποποιήσετε τον ακριβή αριθμό επιπέδων κάποιου κτιρίου και την σειρά που τα κτίρια θα είναι στην ουρά κτίσης ανάλογα με τον σύστημα των προτύπων.
Διαχείριση Προτύπων
Από την προεπιλογή όταν ανοίγετε τον Διαχειριστή λογαριασμού σας ανοίγει την σελίδα Διαχείριση Χωριών. Για να διαχειριστείτε τα πρότυπα παρακαλούμε πατήστε στο Διαχείριση Προτύπων.
Πρότυπα του Συστήματος
Το σύστημα σας διαθέτει τρία πρότυπα που μπορείτε να χρησιμοποιήσετε. Αυτά δεν μπορούν να επεξεργαστούν ή να διαγραφούν.
Αυτά τα πρότυπα είναι:
- Πόροι - Γενικά χτίσιμο χωριού που ως πρώτο του στόχο έχει να ανεβάσει τους πόρους στο επίπεδο 30.
- Αμυντικά - Για τα χωριά που στρατολογούν Αμυντικές μονάδες.
- Επιθετικά - Για τα χωριά που στρατολογούν Επιθετικές μονάδες.
Δημιουργήστε το δικό σας Πρότυπο
Μπορείτε να δημιουργήσετε δικό σας προσαρμοσμένο πρότυπο αν τα πρότυπα του συστήματος δεν ταιριάζουν στις ανάγκες σας. Για να το κάνετε αυτό, συμπληρώστε όνομα στο Δημιουργία προτύπου και επιλέξτε είτε να αρχίσετε από την αρχή με την αντιγραφή ενός κενού προτύπου ή να αντιγράψετε ένα υπάρχων πρότυπο.
Δείτε, μετονομάστε και διαγράψτε πρότυπα
Κάτω από την ενότητα Δημιουργία προτύπου θα βρείτε μια λίστα με τα υπάρχοντα πρότυπα. Τα επίπεδα των κτιρίων που φαίνονται στον πίνακα είναι τα επίπεδα που πρέπει να φτάσουν τα κτίρια στο χωριό σας όταν θα τελειώσει ο Διαχειριστής Λογαριασμού την εργασία του.
Μπορείτε να κάνετε κλικ στο ![]() για να μετονομάσετε ένα πρότυπο ή στο
για να μετονομάσετε ένα πρότυπο ή στο ![]() για να διαγράψετε ένα πρότυπο. Σημείωση: Τα πρότυπα του συστήματος δεν μπορούν να διαγραφούν ή να επεξεργαστούν.
για να διαγράψετε ένα πρότυπο. Σημείωση: Τα πρότυπα του συστήματος δεν μπορούν να διαγραφούν ή να επεξεργαστούν.
Για να δείτε ή να επεξεργαστείτε την σειρά ενός προτύπου κάντε κλικ στο όνομα του.
Επεξεργασία προτύπων
Just like on the previous page the Summary section will show the target levels for each building.
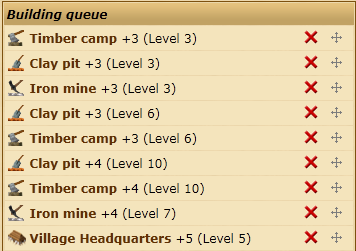
Below this, the Building queue shows the exact order the buildings will be upgraded.
The items in the Building queue list show the building to be upgraded, how many levels it should be upgraded, and the level the building will be after the upgrades have finished.
You can delete upgrades from the queue by clicking the ![]() icon. If you wish to change the order of the queue you can click and drag on the
icon. If you wish to change the order of the queue you can click and drag on the ![]() icon.
icon.
However, unlike other sections of the game your deleted/rearranged queues are not immediately saved. You need to click on the "Save" button below to save your changes! You also need to click "Save" after adding new orders to the queue.
You also have the option of letting the Village Manager demolish any buildings that are higher in level than the target levels in your template. The Village Manager will only do so if your Headquarters is at least level 15 and your village is on 100% loyalty.
To add new buildings to the queue use the Add order section at the bottom of the page.
The Village Manager will queue buildings in exactly the order shown on this page. This means if you add 20 levels of Barracks upgrades in one go, then the Village Manager will do all 20 levels in a row before moving on to the next building. If you were to add 2 Barracks levels, then 2 Smithy levels, then repeat 10 times then the Village Manager will upgrade both buildings gradually
Τοποθέτηση προτύπων στα χωριά σας και διαχείριση χωριών
Μπορείτε να τοποθετήσετε ένα πρότυπο στο χωριό σας και να Διαχειριστείτε τον Διαχειριστή χωριών από την σελίδα Διαχείριση χωριών.
Τοποθέτηση ή αφαίρεση προτύπου σε χωριό
Για να τοποθετήσετε ένα πρότυπο σε ένα ή περισσότερα χωριά πρώτα πρέπει να τα επιλέξετε κλικαροντας τα κουτάκια που βρίσκονται στα αριστερά των ονομάτων χωριού.
Μετά, σιγουρευτείτε ότι το Χρησιμοποίηση προτύπου είναι επιλεγμένο στο κουτάκι Ενέργεια, επιλέξτε ένα πρότυπο γι αυτή την λίστα και στην συνέχεια κάντε κλικ στο Επιβεβαίωση.
Μπορείτε να επιβεβαιώσετε ότι το πρότυπο είναι ενεργό κοιτάζοντας την στήλη Κατάσταση για το χωριό στην ερώτηση. Πρέπει να λέει Ενεργό.
Για να αφαιρέσετε ένα πρότυπο από ένα χωριό πρέπει να κάνετε ότι κάνατε και πιο πάνω απλά πρέπει να επιλέξετε το Αφαίρεση.
Μπορείτε επίσης να τοποθετήσετε ένα πρότυπο σε κάποιο χωριό σας απλά πηγαίνοντας στο Επιτελείο, κλικαρετε στο Διαχειριστή Χωριού και επιλέξτε ένα πρότυπο από την λίστα Αλλαγή προτύπου.
Προσωρινή διακοπή λογαριασμού και επαναλειτουργία
If you want to save your resources in a village then it is possible to pause the Village Manager without having to remove the template.
You can do this in a similar fashion to adding a template to a village, just either select Pause or Continue from the drop down box.
You can also directly click Pause or Continue in the status column for the village.
General notes
The Village Manager will periodically check your building queue and queue new upgrades when possible. It can sometimes take a few minutes for the manager to start queuing buildings after you've assigned a template.
The manager cannot bypass building, population or resource requirements.
If a village's warehouse is not large enough for the next upgrade in the build order to be queued then it will attempt to queue a warehouse upgrade.
Similarly, if the farm is too small it will attempt to queue a farm upgrade.
The village manager allows you to process up to 50 building orders automatically in each village, after which it will pause and you must reactivate it.
Troop Manager
The troop manager allows you to automate the recruiting of units, by choosing how many units you want to build in each village. When resources are available, the troop manager will automatically recruit units for you.
You can apply troop numbers directly to villages, or you can create and save templates to keep for future use, and apply them to villages later.
Using the troop manager to recruit units
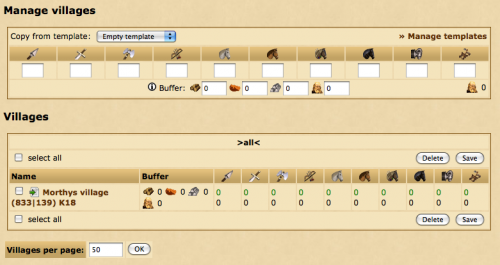
In the "Manage villages" panel at the top of the troop manager screen, enter in the number of units you would like to be built in total for one village. You can also set a buffer if you like, to reserve resources or population space. Once you are happy with your input, in the villages panel below check (tick) the villages you would like to apply this troop build to, then click save to start the recruitment process.
If you have created templates (see below for how to do this), you can apply these to villages instead of inputting a new set of unit numbers each time. In the top panel (the "Manage villages" panel), choose the template you want to use from the dropdown list. Then, in the villages panel, check (tick) the villages you would like to apply a template to. Click the save button to apply your chosen template to those selected villages.
It usually takes a few minutes for your troops to start being recruited if you have the resources and farm space available.
Buffer
You can choose to reserve population slots or resources so they will not be used by the troop manager. For example, if you set your population buffer to 100, then 100 population slots will always be kept free and the troop manager will stop recruiting new units when you only have 100 population slots left in your farm.
Creating and editing your own templates
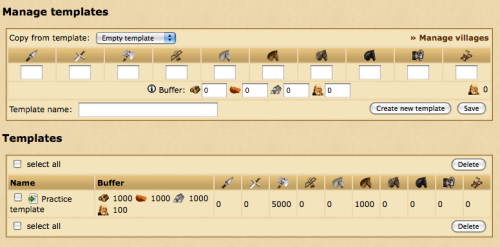
To edit templates or make new ones, click the manage templates link in your troop manager. This will bring you to the template editor screen.
Creating a new template
Enter in your desired final troop numbers into the units input boxes, and give it a name in the "template name" field. You can also set a buffer value for this template. Once you have done this, click "create new template" to save the new template.
Editing an existing template
To edit an existing template, click the green edit icon beside the name of the template you want to edit in the templates panel at the bottom of the screen. This will insert the template information into the area above. Adjust the troop numbers and buffer as desired, and then click "save".
Applying templates to villages
Once you have created a template, you will need to apply it to a village to get it to start recruiting units. You can do this from the main Troop Manager screen.
In the top panel (the "Manage villages" panel), choose the template you want to use from the dropdown list. Then, in the villages panel, check (tick) the villages you would like to apply a template to. Click the save button to apply your chosen template to those selected villages.
Deleting templates
To delete a template, check (or tick) the box beside the template name, and click "delete".
Διαχειριστής Αγοράς
Ο διαχειριστής της αγοράς σας επιτρέπει να ρυθμίσετε την αυτόματη μεταφορά πόρων μεταξύ των χωριών σας, που έχουν αποσταλεί σε προκαθορισμένους χρόνους.
Δημιουργείστε μια νέα διαδρομή συναλλαγών
Παρακαλούμε σημειώστε ότι όταν δημιουργείτε μια νέα διαδρομή συναλλαγών το χωριό που θα στέλνει τους πόρους είναι το χωριό που έχετε επιλέξει εκείνη την στιγμή.
Για να δημιουργήσετε μια νέα διαδρομή συναλλαγών, είτε εισάγετε τις συντεταγμένες του χωριού που θα πάνε οι πόροι στον Προορισμό ή χρησιμοποιείστε τα Αγαπημένα, Δικά μου ή Ιστορικό που μπορούν να σας βοηθήσουν για να βρείτε τα χωριά.
Μετά, εισάγετε τον αριθμό των πόρων που πρέπει να μεταφερθούν στην ενότητα Πόροι.
Τέλος, you can choose when the resources should be sent. You can select any of the days of the week and you need to enter the time of day the transfer should be initiated.
Resources will only be sent if the village has enough resources and enough merchants are available.
Viewing and deleting a trading route
Once you have created trading routes you can view a list of them at the bottom of the page. You can see the next scheduled sending time to be sure you've entered the correct days and time.
It is not currently possible to edit a trading route.
To delete routes either click on the delete link next to the route or tick the check-boxes next to the routes you wish to delete then click the Delete button below.
Farm Assistant
The Farm Assistant allows you to easily send farming attacks to barbarian villages around you, either directly from the map or from recent attack reports in the Account Manager overview.
You can create two templates to configure different combinations of troops to send on farming attacks. For simplicity, these are called A and B.
Creating a new template
To create a new template click on New template underneath the Edit Templates section. A new section should appear on the right side of the page.
You can give your template a description to allow yourself to easily identify it in the future.
Once you've entered the desired troop combinations click Save to add the new template.
Editing or deleting a template
If you need to change the description or troops inside of a template you can edit it by clicking on the template description under the Edit Templates' section.
If you'd prefer to delete a template and start over from scratch you can click the red cross to the right of the template description.
Using the Farm Assistant from the map
Once you've set up one or two templates you can now use the Farm Assistant on the map. Note that you must have the Context menu enabled.
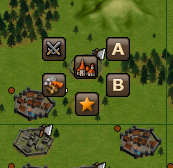
When clicking on a barbarian village you should now notice new icons labeled A and B. These correspond with the templates you created from within the Farm Assistant area. To send an attack simply click on the icon and the troops will be sent with no confirmation required.
Note that this only works on barbarian villages. It is not possible to attack a player owned village without going to the rally point and confirming the attack.
Using the Farm Assistant from the Account Manager overview
You can also use the Farm Assistant to send troops based on your recently received reports. You can do this from the Most recent plunders widget on the Overview.
The widget will show a list of recently received reports where you have attacked a barbarian village and looted resources.
Like the map, you can click on either A or B to send troops from one of your templates to the village.
There is also a C icon, which has a special functionality and does not relate to any of your templates. Clicking on C will use your most recent scout report to attempt to calculate and send the right amount of troops to loot all of the village's resources. You will receive a popup with the exact amount of troops sent.
You can only use the C icon if you have recently scouted the village.
